You are taking pictures for long time and recently, you reluctantly jumped into the whole new world of digital photography. What changes does that means? How do you need to manage your files so that you will be able to find them easily? What precaution you need to take in order to avoid screaming “Oh my God! I lost all my pictures” ?

In this blog, we will share with you, the tools and latest techniques in order to make the most out of digital photography.

Saturday, December 8, 2007

How to organize your pictures on your hard disk

As time goes, you will have more and more pictures stored on your hard disk. The worst possible situation is that all these pictures are spread all over your hard disk, without organization. Don't think you remember where all are stored. It is just a matter of time that something wrong will happen!

So what should be the correct approach ?
As often, there is not only one perfect solution, but plenty of it. Each one must choose it in accordance to its specific needs. But in any case, the rule is that your picture organization must but consistent, unified and scalable so you keep your images orderly. You don't need to think where you will put your files before downloading it from your camera. It must be an obvious repetitive task.

We will present a way of organizing image files that fits for about an average 100 pictures per months and a total collection of about 4,000.

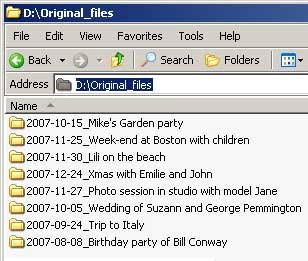
Choose a directory where you want to put your original files. For example “d:\Original_files”. For every shooting session, you will open a new directory with a consistent naming convention, that includes date and photo session information. Typically, you can use a format like YYYY-MM-DD_Session Description.


If you find out that the number of directories is too long, and that it becomes inconvenient always to scroll up and down, you can split the directories and organize them per year.


If still the number of directories is too long, you can split on a per year per month base.


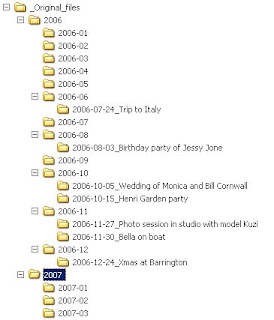
In that way, you will have a chronological list of directories which includes your image files. When you will need to back-up your files, it will be very easily to locate them will never miss anything.

Note that we have discussed here about how to manage physically your pictures. That means, their location on the disk. We will discuss in a later post, how to managed your pictures, how to track them and organize them into collections. This is done by a separate software, and does not relate to the physical location of your pictures.

Monday, December 3, 2007

Time for a picture


A blog about photography cannot be without pictures. So here is the first one. It is one of my favorites and is named "Old couple walking through the desert". Feel free to comment it.

Your pictures are unique, so must be their names!

Your photo session has come to an end. Now you want to transfer your pictures from the camera to your computer. So you are plugging the USB cable connecting your camera to your computer, and “Microsoft Scanner and Camera Wizard” is popping up. After following the instructions, you are requested to fill-in a name for the group of pictures you have taken. Naturally, you fill-in a name in accordance of the subject of the pictures, for example “Beach”. At the end of the process, you get a series of pictures named “Beach001.jpg”, “Beach002.jpg” etc… .

Well … that is really wrong! You just lost your pictures counter information. What do I mean? For efficient management and tracking, every picture should have a unique name. What will happen next time you take a picture on the beach? You will end-up with several different pictures with the same “Beach001.jpg” name. Needless to say that it is just a matter of time that one of them will be erased by confusion.

What should you do? Use the internal counter of your camera. Every camera is naming its pictures in the format like “IMG_0001.jpg”. Keep this naming! That way, you will never confuse your pictures. You may want to add some words identifying the picture. That is OK as long as the counter number is still present. So you will have a file name like “Linda_at_the_beach_IMG_0001.jpg” or “IMG_0001_Linda_at_the_beach.jpg”. Please note that on some camera models, the default setting reinitialises the counter every time you are transferring your pictures to the computer. You should change this setting so no reinitialisation of the counter occurs.

Some will ask “what will happen when the 10,000’s picture will be taken?”. At that time, you will add a “1” to the picture number. How? In one of next posts, we will discuss convenient tools on how to do that.

What has changed?

Digital era has been a revolution for photography. It has modified the habits of the amateur photographers as well as those professionals.

In those times (not so long time ago), major components of the photographer were:

  • A camera;
  • Films;
  • Dark room lab (black and white/color)
  • Drawers for films and prints storage;
  • Picture albums or presentation books.

Today, with the digital era, almost every component has been changed. Today equivalent components are:

  • A digital camera;
  • Memory cards;
  • Computer for digital darkroom (for post-processing), and color printer;
  • Storage system for digital information;
  • Pictures album and presentation books.

In contrary to film based pictures which was difficult to be viewed if not printed, digital pictures can easily be viewed on a computer screen. Consequently, large part of today’s picture taken will never be printed. They will be stored and viewed mostly on a computer, resulting in potential risk of loss if not correctly managed. How many times did you hear somebody telling you how he lost all his children pictures because of a crashed disk, erased by mistake or his laptop was stolen?

In the coming posts, we will discuss every components of digital photography, with special focus on how to manage you digital pictures.